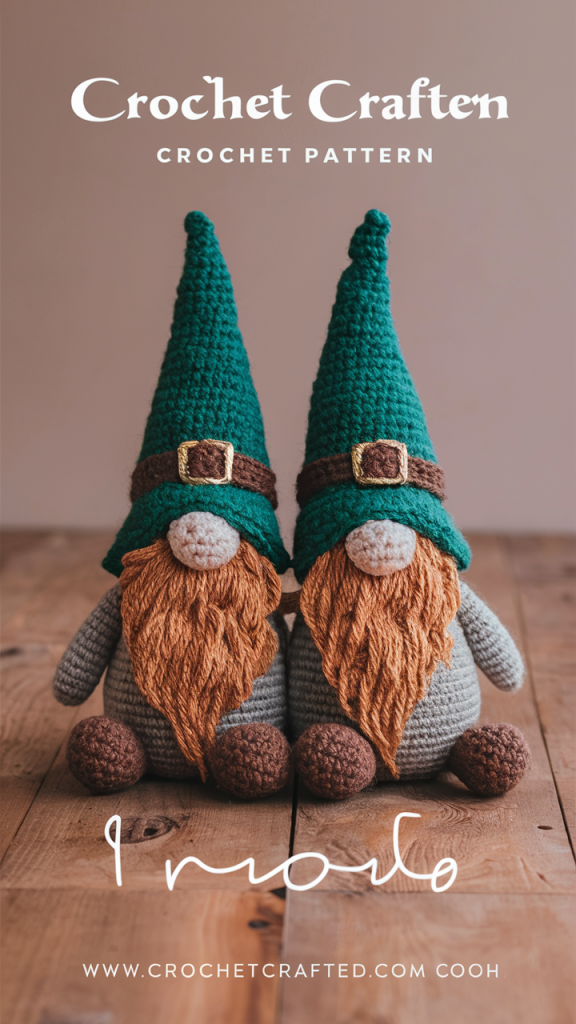
Create a Whimsical Gnome with Ease, Even if You’re New to Amigurumi! Discover our beginner-friendly crochet gnome amigurumi pattern, designed to guide you through crafting charming gnomes using simple flat and spiral crochet techniques, along with some seaming. This modern twist on classic gnomes offers a fresh and simple approach, perfect for those looking to explore amigurumi without advanced skills
Crocheting these gnomes offers a fresh and enjoyable experience for crafters of all skill levels. Whether you choose to use them as festive decorations or give them as gifts to little ones, the choice is yours
Easiest Gnome Amigurumi

Discover how simple it is to crochet a charming gnome with this easy step-by-step tutorial suitable for all skill levels! Perfect for beginners, it shows you how to create a cute gnome with a lively spiral beard and a non-pointy hat. Ideal for decorating or gifting, you’ll need basic yarn, a hook, and a bit of creativity. Add a whimsical touch to any space
Not only is the process soothing, but it also creates a heartwarming result that adds a smile and a touch of magic to any room or festive occasion. You’ll absolutely adore them
Free pattern and design by @crochetcrafted
Required Supplies
The designer of this crochet pattern suggests using the following specific types of crochet supplies
- Sport weight yarn in dark green, light green, orange, cream, yellow, and black colors is needed. The designer used Yarn and Colors Must-Have yarn in the following shades: ‘Forest’ for dark green, ‘Grass’ for light green, ‘Bronze’ for orange, ‘Cream’ for cream, ‘Sunflower’ for yellow, and ‘Anthracite’ for black.
- Crochet hook 2.00 mm;
- Fiberfill for stuffing;
- Scissors
- Yarn needle.
Finished Size:
With the specified materials, the toy measures 4 inches in size. If you use a different yarn weight or crochet hook size, the dimensions may vary.
Skills Required :
You should be familiar with the following crochet techniques: chain, slip stitch, single crochet, increase, decrease, reverse single crochet, as well as crocheting in rows and a bit in rounds.
Abbreviations
- ch-chain.
- sc single crochet
- inc increase
- dec decrease
- sl st -slip stitch
- rsc-reverse single crochet
Crochet Gnome Pattern
This gnome amigurumi can be crocheted using the following pattern, specifically designed for beginners. Before starting, ensure you are familiar with the crochet skills mentioned above.

Body
- Ch 9.
-
ROW 1:
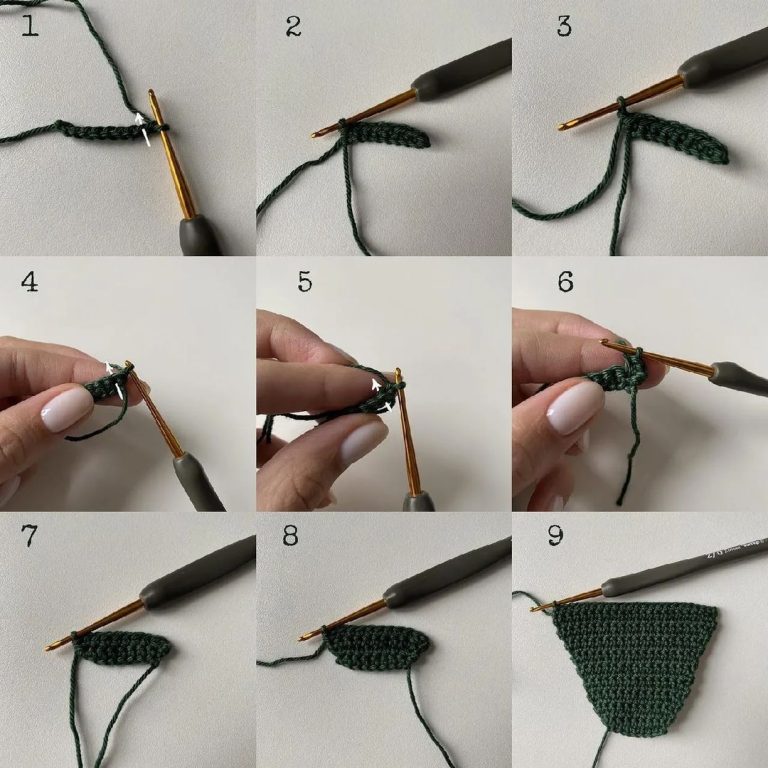
Start crochet in the second ch from the hook, sc in next 8 ch [8](pic.1 & pic.2)
-
ROW 2:
Ch 1, turn the detail, inc in next st, sc in next 6 st, inc in next st [10](pic.3 – pic.6)
-
ROW 3:
Ch 1, turn the detail, sc in next 10 st [10](pic.7)
-
ROW 4:
Ch 1, turn the detail, inc in next st, sc in next 8 st, inc in next st [12](pic.8)
-
ROW 5:
Ch 1, turn the detail, sc in next 12 st [12]
-
ROW 6:
Ch 1, turn the detail, inc in next st, sc in next 10 st, inc in next st [14]
-
ROWS 7-8:
Ch 1, turn the detail, sc in next 14 st [14] – 2 rows(pic.9)
-
ROW 9:
Ch 1, turn the detail, inc in next st, sc in next 12 st, inc in next st [16]
-
ROWS 10-11:
Ch 1, turn the detail, sc in next 16 st [16] – 2 rows
-
ROW 12:
Ch 1, turn the detail, inc in next st, sc in next 14 st, inc in next st [18]
-
ROW 13:
Ch 1, turn the detail, sc in next 18 st [18]
-
ROW 14:
Ch 1, turn the detail, inc in next st, sc in next 16 st, inc in next st [20]
-
ROW 15:
Ch 1, turn the detail, sc in next 20 st [20]
-
ROW 16:
Ch 1, turn the detail, inc in next st, sc in next 18 st, inc in next st [22]
-
ROWS 17-19:
Ch 1, turn the detail, sc in next 22 st [22] – 3 rows(pic.9)
-
ROW 20:
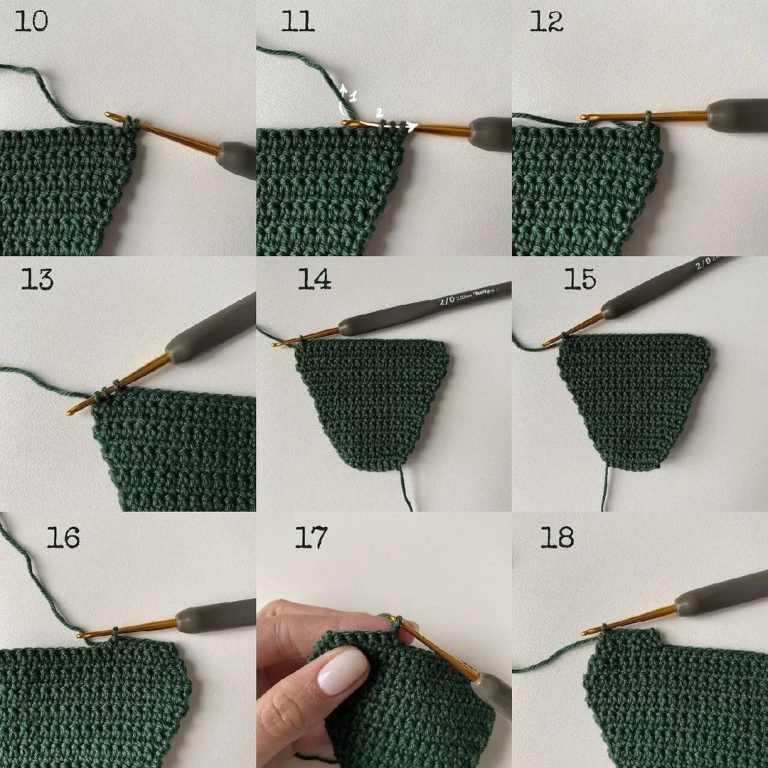
Ch 1, turn the detail, dec, sc in next 18 st, dec [20](pic.10 – pic.14)
-
ROW 21:
Ch 1, turn the detail, sc in next 20 st [20](pic.15)
-
ROW 22a:
Ch 1, turn the detail, dec, sc in next 5 st, do not finish this row [6](pic.16)
-
ROW 23a:
Ch 1, turn the detail, dec, sc in next 4 st [5](pic.17 & pic.18)
-
ROW 24a:
Ch 1, turn the detail, dec, sc in next 3 st [4]
-
ROW 25a:
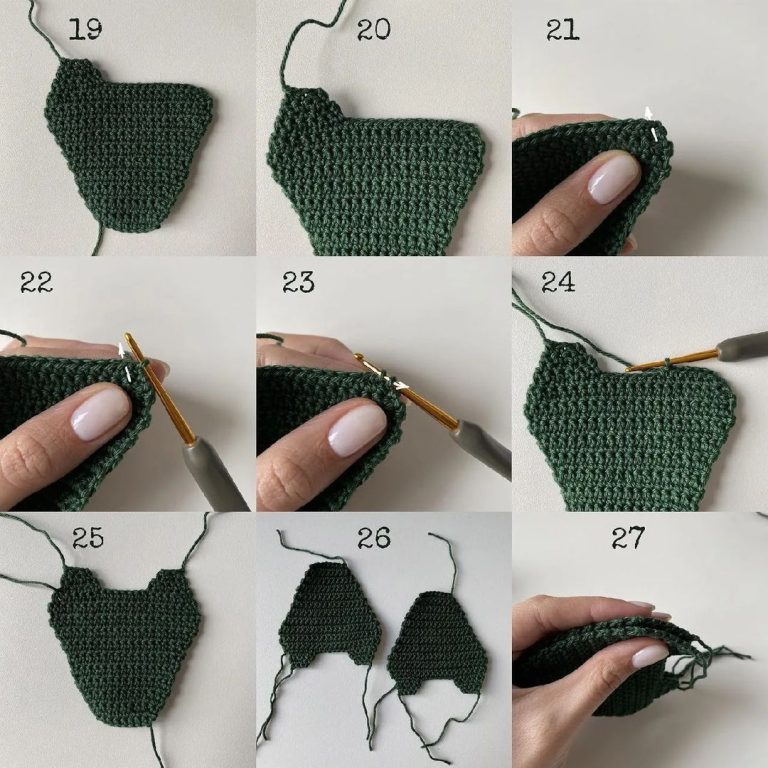
Ch 1, turn the detail, dec, sc in next 2 st [3] Fasten off.(pic.19)
More Pattern for Body
Begin crocheting from the last stitch of Row 21, which will now be considered the first stitch. (See pics. 20-21)
-
ROW 22b:
Dec, sc in next 5 st, do not finish this row [6](pic.21 – pic.24)
-
ROW 23b:
Ch 1, turn the detail, dec, sc in next 4 st [5]
-
ROW 24b:
Ch 1, turn the detail, dec, sc in next 3 st [4]
-
ROW 25b:
Ch 1, turn the detail, dec, sc in next 2 st [3] Fasten off.(pic.25)
-
Assembling:
Make 2 pieces.Place both pieces together, matching up all sides. (pic.26)Begin attaching pieces together with reverse sc around, using light green yarn. Stop in the middle of the last side, stuff the piece. Continue crocheting rsc and close with rsc in the first st. Fasten off and weave in yarn ends. (pic.27 – pic.41)
Pictorial Guide for Body
To crochet the body of this amigurumi, you’ll follow a continuous pattern of flat work involving increases and decreases, as outlined above. The designer has provided detailed images to help clarify each crucial step and show the expected results. You’ll need to complete two flat pieces for the body


NOSE
A simple spherical nose is required, which can be easily attached to the body
-
Nose:
Crochet with cream yarn. Ch 4.RND 1: Start crocheting in the second ch from the hook (pic.42). Sc in the next 2 ch, 3 sc in the next ch. Continue crocheting on the other side of the foundation chains (pic.43). Sc in the next st, 2 sc in the next st [8] (pic.44)RND 2: Inc in the next st, sc in the next 2 st, inc in the next 2 st, sc in the next 2 st, inc in the next st [12] (pic.45)RND 3: Sc in the next 12 st [12]RND 4: Dec, sc in the next 2 st, dec 2 times, sc in the next 2 st, dec [8]Stuff the detail. (pic.46)RND 5: Dec 4 times [4]Fasten off, leaving a long tail for sewing. (pic.47)Then sew the nose between rounds 12-15 of the body.
BEARD
The beard is created using specific decreases to shape the curls:
-
Beard:
Crochet with orange yarn.For the beard, create beard strands by branching off in chains.STRAND 1-36: Ch 11. Start crocheting in the second ch from the hook (pic.48). Sl st in the next 10 ch (pic.49-53)Then sew the beard to the body. (pic.54-59)
HAT
The hat is an amigurumi style, inspired by traditional belly hats:
-
Hat:
Start crocheting with dark green yarn.Ch 19. (pic.60)ROW 1: Start crocheting in the second ch from the hook (pic.61). Sc in the next 18 ch [18] (pic.62)ROW 2-11: Ch 1 (pic.63), turn the detail (pic.64). Sc in the next 18 st [18] for 10 rows (pic.65-66)ROW 12: Ch 1, turn the detail. 4 sc in the next st (pic.67). Sc in the next 16 st, 4 sc in the next st [24] (pic.68)ROW 13: Ch 1, turn the detail (pic.69). 4 sc in the next st (pic.70). Sc in the next 22 st, 4 sc in the next st [30] (pic.71)ROW 14: Ch 1, turn the detail. Sc in the next 30 st [30]Fasten off and weave in yarn ends. (pic.72)Make 2 pieces.Place both pieces together, matching up all sides. (pic.73)Begin attaching pieces together with reverse sc around, using light green yarn. (pic.74-82)With black yarn: Crochet 46 ch (pic.83). Starting in the second ch from the hook, crochet sl st in the next 45 ch. Close with sl st in the first stitch (pic.84). Fasten off and weave in yarn ends. Sew the detail to the hat. (pic.85)With yellow yarn: Crochet 11 ch, then make sl st in the first ch. Fasten off and weave in yarn ends. (pic.86) Sew to the hat.


Thank you so much for following along with this crochet pattern! Your support and enthusiasm mean a lot. Stay tuned for more exciting crochet projects and patterns. See you in the next crochet adventure!
