Hello everyone!
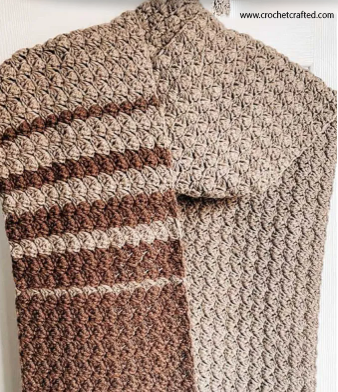
I’m excited to present the Everyday Scarf!
For those who have been with me for a while, you know I love crafting simple crochet projects that you can complete over a weekend.
I’m eager to build a collection where we master a single stitch and use it across various projects.
We did something similar with the Andes Collection, where we created four different projects using just one stitch. It was a hit with over 1 million views on the Andes Headband and the Andes Beanie.
You’re going to love this pattern!
We’re kicking off with the Everyday Scarf—a stunning and straightforward design that’s ideal for winter or the transition from fall to winter.

This scarf features two colors: Color A, which makes up about three-quarters of the scarf, and Color B, which is used for the final section.
Feel free to use just one color if you prefer, but the “transition” between colors adds a lovely effect you might not want to miss.

Stitches You Should Know:
- Chain
- Single Crochet
- Half Double Crochet
- Double Crochet
Materials:
- 4 skeins of category 4 worsted weight yarn, totaling 340 grams (720 meters). Use 3 skeins of Color A (Oatmeal) and 1 skein of Color B (Thrush).
- 6 mm crochet hook
- Scissors
- Tapestry needle
- Gauge swatch: Single Crochet 4″x4″ = 15 sts x 16 rows
Abbreviations (US Terms):
- CH – Chain(s)
- ST(s) – Stitch(es)
- SC – Single Crochet
- HDC – Half Double Crochet
- DC – Double Crochet
Pattern:
- Start with your foundation chain.
- Using Color A, chain 36.
Row 1: Skip 2 chains (counts as 1 sc), work [1 hdc, 1 dc] into the next chain. *Skip 2 chains, work [1 sc, 1 hdc, 1 dc] into the next chain. Repeat from * to the last 3 chains, skip 2 chains, and sc into the final chain.

Row 2: Ch 1 (counts as 1 sc), turn your work. Work [1 hdc, 1 dc] into the first stitch. *Skip 2 stitches, work [1 sc, 1 hdc, 1 dc] into the next stitch. Repeat from * to the last 3 stitches, skip 2 stitches, and sc into the final stitch.
Rows 3-190: Repeat Row 2.
Note: We will now switch colors. Crochet a few rows with Color A and a few with Color B. If you prefer to use only one color for the entire scarf, that’s perfectly fine—just continue with the same color throughout.

Row 191: Repeat Row 2 using Color B.
Rows 192-196: Repeat Row 2 using Color A.
Rows 197-198: Repeat Row 2 using Color B.
Rows 199-201: Repeat Row 2 using Color A.
Rows 202-204: Repeat Row 2 using Color B.
Rows 205-206: Repeat Row 2 using Color A.
Rows 207-210: Repeat Row 2 using Color B.
Row 211: Repeat Row 2 using Color A.
Rows 212-246: Repeat Row 2 using Color B.

Add the Fringes
It’s time to add the fringes! Cut pieces of yarn and attach them to your scarf. For the desired fringe length, cut the yarn pieces to twice the length you want.
I used 3 yarn pieces for each fringe.

Attach the fringes in the corresponding color to each side of your scarf.
And that’s it! You’ve now created this beautiful and simple scarf!
I hope you enjoyed this pattern. If you did, I’d love to see your finished scarves! Feel free to share your photos using the hashtag #EverydayScarf.
Happy Crocheting!

